Create a Hugo Website with GitHub Pages, GitHub Actions, and Cloudflare

In this beginner guide, you’ll create a Hugo website from scratch and publish the website on GitHub Pages. You’ll configure Cloudflare’s DNS and utilize its caching capabilities to optimize page speeds. Finally, implementing automated deployments with GitHub Pages will enable you to publish new content on your site easily.
Motivation
Over the last couple of years, I’ve written documentation for private hobby projects, most of it in Markdown and managed with Git. It’s all over the place, some parts quite elaborate, other stuff just bullet point lists.
I think some of it might be useful for others, so I started looking for ways to publish Markdown documentation and found Hugo. It’s a simple to use, modern, and very popular static site generator that encourages the use of Markdown files. Perfect!
Having found Hugo, I started looking into how to best host static content. I’ve been using GitHub forever, so obviously I chose GitHub Pages. Accompanied by Cloudflare’s caching capabilities, a blazingly fast website is guaranteed.
The only thing missing was a way to automagically publish changes made to the Git repository on the website. This is where GitHub Actions come in.
With the technology figured out, in my very first guide, I’ll show you step by step how I created this website in its first version. You can check out the code on my GitHub where I tagged the resulting commit with version v1.0.0.
The Plan
Here is an overview of what you’ll do:
- Register for third-party services and install the required software
- Prepare the Git repository
- Set up the development environment
- Create a Hugo site from scratch and run it locally
- Set up Cloudflare for a custom root (apex) domain
- Manually deploy the website to GitHub Pages
- Deploy the website automatically to GitHub Pages with GitHub Actions
I created this guide with Windows users in mind, but the workflow should be easily adaptable to other platforms. The steps are detailed and beginner-friendly, so if you’re more experienced, you can skip through most parts of steps 1 to 3.
For this guide, I configured the schnerring.net domain and used schnerring.github.io as the GitHub Pages site. In the instructions, you’ll need to replace these accordingly.
Step #1: Prerequisites
First, you’ll need to register for a couple of services and install some software. Everything mentioned is free, except registering a custom domain name. I’m not affiliated with any of the products I recommend in this guide.
Sign Up at Third-Party Services
- Register a domain name with your registrar — I’m a very happy Namecheap customer
- Sign up at Cloudflare
- Sign up at GitHub
Install Software for Development
Install the following programs for local development on our workstation:
- Hugo — make sure to install
hugo-extendedto be able to use themes that utilize Sass/SCSS - Git for Windows — source control management and shell
- Visual Studio Code — editor for coding
- Google Chrome — web browser for debugging
I used the Git Bash terminal to create the instructions for this guide. It’s bundled with Git for Windows and provides UNIX-like commands like rm, touch, and more.
Step #2: Prepare Git
Create a GitHub Repository
Sign in to your GitHub account and create a new repository. To create a user type website with GitHub Pages, name the repository schnerring.github.io.
If you want to know more about GitHub Page types, you can find further information in the GitHub Docs.
Make sure to initialize the repository with a README and a LICENSE file. For this project, I chose the MIT license.
Clone the Newly Created Repository and Open It in VS Code
If you haven’t already, configure an SSH key to use with GitHub. You’re now ready to clone the GitHub repository to your workstation. Open a Git Bash terminal and run the following commands:
git clone [email protected]:schnerring/schnerring.github.io.git
cd schnerring.github.io
code .
Step #3: Prepare VS Code
To make it easier to write clean and consistent code, install the following extensions:
EditorConfig helps maintain consistent coding styles for multiple developers working on the same project across various editors and IDEs.
markdownlint is a static analysis tool for Node.js with a library of rules to enforce standards and consistency for Markdown files
ShellCheck is a GPLv3 tool that gives warnings and suggestions for bash/sh shell scripts
Add the .vscode/extensions.json File
Workspace recommended extensions for VS Code make it easy to share a set of extensions easily across development environments. When you open a repository folder in VS Code and some recommended extensions are missing, you’ll be notified, and just one click away from installing them.
Here’s what the file looks like:
{
  "recommendations": [
    "editorconfig.editorconfig",
    "davidanson.vscode-markdownlint",
    "omartawfik.github-actions-vscode",
    "timonwong.shellcheck"
  ]
}
Add the .vscode/launch.json File
When running hugo server locally during development, it’s nice to be able to open http://localhost:1313 in Chrome from within VS Code by just hitting the F5 key. For this, you need to add a launch configuration. VS Code stores launch configurations in the launch.json file located in the .vscode/ folder.
For Windows, the configuration looks like this:
{
  // Use IntelliSense to learn about possible attributes.
  // Hover to view descriptions of existing attributes.
  // For more information, visit: https://go.microsoft.com/fwlink/?linkid=830387
  "version": "0.2.0",
  "configurations": [
    {
      "type": "pwa-chrome",
      "request": "launch",
      "name": "Launch Chrome against localhost",
      "url": "http://localhost:1313",
      "webRoot": "${workspaceFolder}"
    }
  ]
}
Check out the official documentation to learn more about debugging in VS Code.
Add the EditorConfig Configuration
Add the .editorconfig file to the root folder of the repository:
# top-most EditorConfig file
root = true

# every file
[*]
charset = utf-8
indent_size = 2
indent_style = space
insert_final_newline = true
trim_trailing_whitespace = true

# Markdown files
[*.md]
trim_trailing_whitespace = false
Check out EditorConfig if you want to learn more, it’s awesome!
Add the .gitignore File
To prevent cluttering of the repository with files generated by VS Code, add a .gitignore file to the root of the repository. To generate the .gitignore file, I like to use gitignore.io. Hugo adds a debug.log file from time to time which I manually add, as well.
debug.log

# Created by https://www.toptal.com/developers/gitignore/api/hugo,vscode
# Edit at https://www.toptal.com/developers/gitignore?templates=hugo,vscode

### Hugo ###
# Generated files by hugo
/public/
/resources/_gen/
hugo_stats.json

# Executable may be added to repository
hugo.exe
hugo.darwin
hugo.linux

### vscode ###
.vscode/*
!.vscode/settings.json
!.vscode/tasks.json
!.vscode/launch.json
!.vscode/extensions.json
*.code-workspace

# End of https://www.toptal.com/developers/gitignore/api/hugo,vscode
Push Development Environment Settings to GitHub
The folder structure now looks like this:
.vscode/
├─ extensions.json
├─ launch.json
.editorconfig
.gitignore
LICENSE
README.md
Push the changes to GitHub:
git add --all
git commit --message="Add vscode launch.json / extensions.json, .editorconfig, .gitignore"
git push
Step #4: Enter Hugo
Only a few steps are required to create a functional Hugo site.
Create a New Site
To create a Hugo site in your current working folder, use the Hugo CLI:
hugo new site . --force
With --force, Hugo won’t complain about the folder containing files.
Add a Theme
To get started quickly, add the Hello Friend theme as a Git Submodule. Check out themes.gohugo.io for more themes.
git submodule add https://github.com/panr/hugo-theme-hello-friend.git themes/hello-friend
Update the Hugo Configuration
The Hello Friend theme requires minimal configuration steps to work. As a baseline, use the sample provided in the themes’ README and make some straightforward changes to it.
The resulting config.toml looks like this:
baseURL = "https://schnerring.net"
languageCode = "en-us"
theme = "hello-friend"
paginate = 5
ignoreFiles = [ "LICENSE$" ]

[params]
  # dir name of your blog content (default is `content/posts`).
  # the list of set content will show up on your index page (baseurl).
  #contentTypeName = "posts"

  # "light" or "dark"
  defaultTheme = "dark"

  # if you set this to 0, only submenu trigger will be visible
  showMenuItems = 2

  # Show reading time in minutes for posts
  showReadingTime = false

  # Show table of contents at the top of your posts (defaults to false)
  # Alternatively, add this param to post front matter for specific posts
  # toc = true

  # Show full page content in RSS feed items
  #(default is Description or Summary metadata in the front matter)
  # rssFullText = true

[languages]
  [languages.en]
    title = "Michael Schnerring"
    subtitle = "Coder and Computer Enthusiast"
    keywords = ""
    description = "Michael Schnerring is a coder and computer enthusiast."
    copyright = "<p>Copyright © 2020 Michael Schnerring</p><p xmlns:dct='http://purl.org/dc/terms/' xmlns:cc='http://creativecommons.org/ns#' class='license-text'><a rel='cc:attributionURL' property='dct:title' href='https://github.com/schnerring/schnerring.github.io/tree/main/content'>Content</a> licensed under <a rel='license' href='https://creativecommons.org/licenses/by/4.0'>CC BY 4.0</a></p>"
    menuMore = "Show more"
    writtenBy = "Written by"
    readMore = "Read more"
    readOtherPosts = "Read other posts"
    newerPosts = "Newer posts"
    olderPosts = "Older posts"
    minuteReadingTime = "min read"
    dateFormatSingle = "2006-01-02"
    dateFormatList = "2006-01-02"
    # leave empty to disable, enter display text to enable
    #lastModDisplay = "modified"

    [languages.en.params.logo]
      logoText = "schnerring.net"
      logoHomeLink = "/"
    # or
    #
    # path = "/img/your-example-logo.svg"
    # alt = "Your example logo alt text"

    [languages.en.menu]
      [[languages.en.menu.main]]
        identifier = "about"
        name = "About"
        url = "/about"
The themes’ GitHub repository features another config.toml example. You can read more about how to configure Hugo in the official documentation.
Add Some Content
With the help of the Hugo CLI, add an about page and the first blog post:
hugo new about.md
hugo new posts/hello-world.md
about.md
---
title: "About"
draft: false
---

I code by day and toy around with computers by night...
posts/hello-world.md
---
title: "Hello World"
description: "The first post of this blog"
date: 2021-03-14T15:00:21+01:00
draft: false
tags:
  - "csharp"
  - "hello world"
---

I'm a .NET developer by trade, so let's say hello in C#!

```csharp
using System;

class Program
{
    public static void Main(string[] args)
    {
        Console.WriteLine("Hello, world!");
    }
}
```
Note the post’s default status draft: true, so newly created content has to be published manually. You can read more about it in the official documentation. Make sure to set this to false before deployment or the post won’t be displayed.
Run the Site Locally
To finally test the changes locally, run the following in a Git Bash terminal. The --buildDrafts (or -D) option enables you to also view content that has set draft: true.
hugo server --buildDrafts
Hit the F5 button in VS Code to open the page in Chrome.
Push the Changes
Git ignores empty folders, so if you push the current changes and re-clone the repository, the Hugo folder structure would be partially gone. A common practice is to add empty .gitkeep marker files to empty folders to prevent this:
touch {data,layouts,static}/.gitkeep
Your folder structure should look like this, excluding resources or public folders, since those are .gitignored:
.vscode/
├─ extensions.json
├─ launch.json
archetypes/
├─ default.md
content/
├─ posts/
│  ├─ hello-world.md
├─ about.md
data/
├─ .gitkeep
layouts/
├─ .gitkeep
static/
├─ .gitkeep
themes/
├─ hello-friend/    (submodule)
.editorconfig
.gitignore
.gitmodules
config.toml
LICENSE
README.md
Commit and push everything:
git add -A
git commit -m "Add Hugo site, hello-friend theme, about page and hello-world post"
git push
Step #5: Configure Cloudflare
Add the Site to Cloudflare
- Sign in to your Cloudflare account
- Click + Add site in the navigation bar and add
schnerring.net - Select Free plan
- Navigate to the Overview page of the newly created site
- Take note of Cloudflare’s nameservers, in my case carol.ns.cloudflare.com and cody.ns.cloudflare.com
Change the Nameservers for Your Domain
Sign in to the administrator account of your domain registrar and change the nameservers. My Namecheap nameserver configuration for schnerring.net looks like this after adding the Cloudflare nameservers:

Add the CNAME Records
A CNAME record is used to map one domain name to another. Go to the DNS management at Cloudflare and add the following records to point your domain to GitHub Pages:

Make sure the “orange cloud” is enabled, so you can define rules and cache static content with Cloudflare.
Enable Full SSL/TLS Encryption Mode
Go to your site’s SSL/TLS settings and set encryption to Full:

Configure the Browser Cache TTL
Go to Cache → Configuration and choose 2 months or higher, depending on how often you think your already published static content changes.

Add Page Rules
The Free Tier lets you create up to three page rules. Go to your site’s Page Rules settings and click Create Page Rule.
Enforce HTTPS

Add Forward from www.schnerring.net Subdomain to schnerring.net Root Domain
If you use a subdomain, skip this step.

Cache All Static Content to Speed Up the Website

Page Rules Overview

Note that as of May 2018 GitHub Pages supports HTTPS for custom domains out of the box. They utilize Let’s Encrypt certificates which are better than the shared certificates you get with Cloudflare. But to issue Let’s Encrypt certificates for both www.schnerring.net and schnerring.net, you’d have to resort this, in my opinion hacky, solution.
Step #6: Deploy the Site to GitHub Pages
You’ll deploy the website to GitHub Pages on a separate, parallel gh-pages branch since published artifacts and source code are segregated this way. You can learn more about other options in the official Hugo documentation.
Initialize gh-pages branch
Create an orphan branch which has a git init like state with no history:
git checkout --orphan gh-pages
git reset --hard
git commit --allow-empty -m "Init gh-pages branch"
git push origin gh-pages
git checkout main
Checkout the gh-pages Branch in public/
To build the site, use the hugo command. The build artifacts will be placed in the public/ folder, the contents of which need to be published on the gh-pages branch. To be able to checkout multiple branches, use Git’s worktree feature:
git worktree add -B gh-pages public origin/gh-pages
Add CNAME File to static/ Folder
Earlier, you configured Cloudflare to properly map www.schnerring.net and schnerring.net to schnerring.github.io’s destination. However, you also need a redirect from schnerring.github.io to schnerring.net. You accomplish this by adding a static/CNAME file to the repo, containing your custom domain. When generating the site with hugo, the published site will contain the CNAME file at its root:
echo "schnerring.net" > static/CNAME
rm static/.gitkeep
git add -A
git commit -m "Add CNAME file"
git push
Build the Hugo Site
Make sure to set draft: false to publish the hello-world.md post. Push the change to GitHub by running git commit -am "Publish hello-world.md" && git push.
Then run hugo.
Push the Changes on the gh-pages Branch
cd public
git add -A
git commit -m "Publish to gh-pages"
git push
cd ..
Set gh-pages as Publishing Branch
Navigate to your repository on GitHub
- Go to Settings → Pages
- Under Source, select Branch:
gh-pagesand click Save
It should look like this:

Shortly after you perform these steps, your website should be available at schnerring.net.
Subsequent Deployments
For future deployments, several steps are required:
- Delete contents of
public/folder, sincehugodoes not remove generated files before building - Generate the site with
hugo - Push changes to the
gh-pagesbranch - Purge Cloudflare cache
This is an error-prone and tedious process if repeated frequently, so let’s automate these steps with GitHub Pages next.
Step #7: Automate Deployments with GitHub Actions
Configure GitHub Actions
GitHub Actions Workflows are configured mostly through configuration files in the .github/workflows folder. This allows your configuration to be version controlled and flexible.
Add the following .github/workflows/hugo.yml file to the repository:
name: Hugo

on:
  push:
    branches:
      - main

  # Allows to run workflow manually from Actions tab
  workflow_dispatch:

jobs:
  build:
    runs-on: ubuntu-latest
    steps:
      - name: Checkout repository and update Hugo themes
        uses: actions/checkout@v2
        with:
          submodules: true
          fetch-depth: 0 # Fetch all history for .GitInfo and .Lastmod

      - name: Install Hugo
        uses: peaceiris/actions-hugo@v2
        with:
          hugo-version: "0.81.0"
          extended: true

      - name: Build Hugo
        run: hugo --minify

      - name: Deploy to GitHub Pages
        uses: peaceiris/actions-gh-pages@v3
        with:
          github_token: ${{ secrets.GITHUB_TOKEN }}
          publish_dir: ./public

      - name: Purge Cloudflare Cache
        env:
          CLOUDFLARE_ZONE_ID: ${{ secrets.CLOUDFLARE_ZONE_ID }}
          CLOUDFLARE_API_TOKEN: ${{ secrets.CLOUDFLARE_API_TOKEN }}
          GITHUB_TOKEN: ${{ secrets.GITHUB_TOKEN }}
        run: |
          chmod +x ./purge_cloudflare_cache.sh
          ./purge_cloudflare_cache.sh
Name the GitHub Actions Workflow Hugo which is triggered when pushed to the main branch. As OS, the latest version of ubuntu is used.
We only run one job, build, and perform the following steps:
- Checkout the repository and update Hugo themes
- Install Hugo
extendedsince the theme uses SCSS. - Build Hugo and
--minify - Deploy to GitHub Pages. The default deployment branch is
gh-pages. Choose the./publicfolder to be published. - Purge the Cloudflare Cache by running the
./purge_cloudflare_cache.shscript that you’ll create in the next steps.
The above is straight forward, thanks to the free Actions available at the GitHub Marketplace. Thanks to peaceiris for the awesome work:
Note the mapping of the environment variables required in step 4 and 5. You’ll later configure the GitHub secrets that will be injected as environment variables into the context of the respective steps. The GITHUB_TOKEN doesn’t need to be configured for GitHub Actions, since GitHub automatically creates it to use in your workflow. For local debugging though, you’ll have to create a token, anyway.
Create a GitHub Personal Access Token
Personal access tokens (PAT) are an alternative to using passwords for authentication to GitHub when using the GitHub API or the command line.
Go to your GitHub profile’s Settings → Developer settings → Personal access tokens. Click Generate new token, select only the public_repo scope and enter the note schnerring.github.io, to be able to later recognize what it’s used for.
You only get one chance to copy the token’s value, so add a new environment variable named GITHUB_TOKEN to your local system:

If you lose the token, just delete and then recreate it.
Create the purge_cloudflare_cache.sh Script
Purge the Cloudflare Cache
Use Cloudflare’s API to purge all cached files with curl after successful deployment:
curl \
  --silent \
  --request POST \
  --header "Authorization: Bearer ${CLOUDFLARE_API_TOKEN}" \
  --header "Content-Type: application/json" \
  --data '{"purge_everything":true}' \
  "https://api.cloudflare.com/client/v4/zones/${CLOUDFLARE_ZONE_ID}/purge_cache"
Before you can run the command above, set CLOUDFLARE_ZONE_ID and CLOUDFLARE_API_TOKEN as environment variables in your GitHub repository and your workstation. You can add secrets in your GitHub repository’s Settings → Secrets → New repository secret:
Set
CLOUDFLARE_ZONE_IDto your Cloudflare site’s Zone ID which you can find it on your site’s Overview page.Set
CLOUDFLARE_API_TOKENto an API Token with Zone.Cache Purge permissions. Create one at My Profile → API Tokens → Create Token → Create Custom Token → Get started: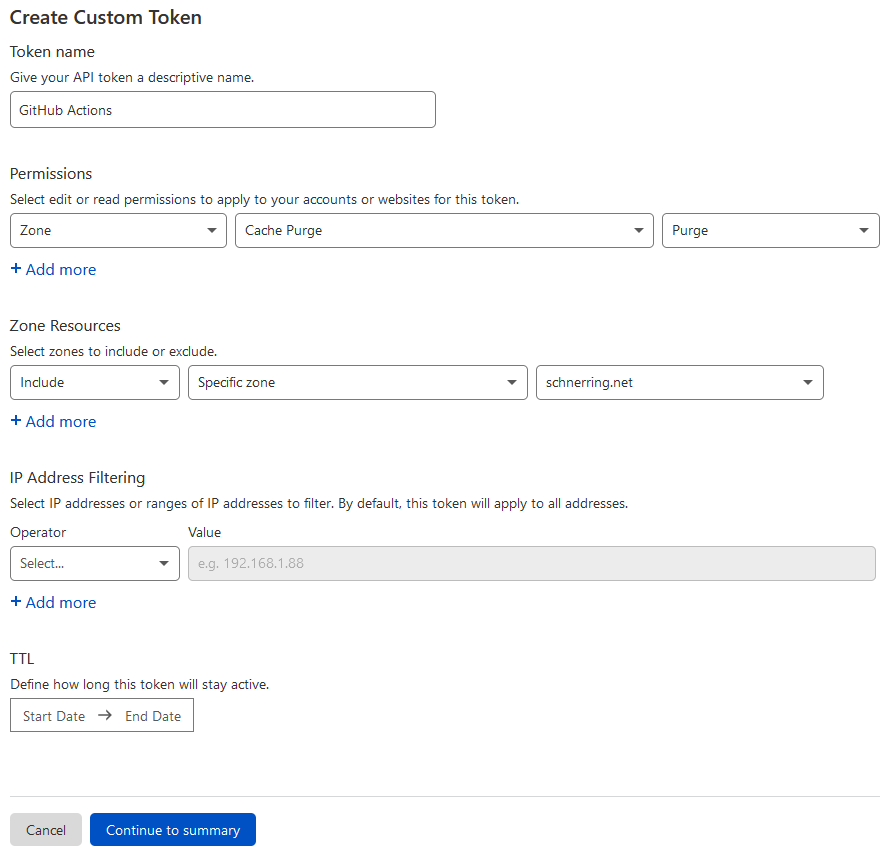

You should then be able to locally run the curl snippet above which should output "success": true:
{
  "result": {
    "id": "********************************"
  },
  "success": true,
  "errors": [],
  "messages": []
}
Polling the GitHub Pages Build Status
Before purging the site’s cache on Cloudflare, make sure that the GitHub Pages build completed successfully. Via GitHub’s API, query the latest GitHub Pages build with curl:
curl \
  --silent \
  --user "schnerring:${GITHUB_TOKEN}" \
  --header "Accept: application/vnd.github.v3+json" \
  "https://api.github.com/repos/schnerring/schnerring.github.io/pages/builds/latest"
The GITHUB_TOKEN you configured earlier is used here. Executing the snippet locally will output "status": "built" if the GitHub Pages build succeeded:
{
  "url": "https://api.github.com/repos/schnerring/schnerring.github.io/pages/builds/123456789",
  "status": "built",
  "error": {
    "message": null
  },
  ...
}
Put It All Together
#!/usr/bin/env bash

readonly DELAY_STEP_SECONDS=15
readonly INTERVAL_SECONDS=5
readonly TIMEOUT_SECONDS=120

readonly GITHUB_USER=schnerring
readonly GITHUB_REPO=schnerring.github.io

##################################################
# Poll status of latest GitHub Pages build every INTERVAL_SECONDS seconds for up
# to TIMEOUT_SECONDS seconds.
# Globals:
#   GITHUB_REPO
#   GITHUB_TOKEN
#   GITHUB_USER
#   INTERVAL_SECONDS
#   TIMEOUT_SECONDS
# Arguments:
#   None
# Outputs:
#   Success message to stdout or error message to stderr.
# Returns:
#   0 on success, 1 otherwise.
##################################################
function poll_build_status() {
  echo "Awaiting completion of latest GitHub Pages build ..."
  local waited_seconds=0
  while [[ "${waited_seconds}" -lt "${TIMEOUT_SECONDS}" ]]; do
    if curl \
      --silent \
      --user "${GITHUB_USER}:${GITHUB_TOKEN}" \
      --header "Accept: application/vnd.github.v3+json" \
      "https://api.github.com/repos/${GITHUB_USER}/${GITHUB_REPO}/pages/builds/latest" \
      | grep -q '"status": "built"'; then
      echo "Success."
      return 0
    fi
    echo "  Sleeping ${INTERVAL_SECONDS} seconds until next status poll ..."
    sleep "${INTERVAL_SECONDS}"
    (( waited_seconds += INTERVAL_SECONDS ))
  done
  echo "Failure." >&2
  return 1
}

##################################################
# Purge entire Cloudflare cache.
# Globals:
#   CLOUDFLARE_API_TOKEN
#   CLOUDFLARE_ZONE_ID
# Arguments:
#   None
# Outputs:
#   Success message to stdout or error message to stderr.
# Returns:
#   0 on success, 1 otherwise.
##################################################
function purge_cache() {
  echo "Purging Cloudflare cache ..."
  if curl \
    --silent \
    --request POST \
    --header "Authorization: Bearer ${CLOUDFLARE_API_TOKEN}" \
    --header "Content-Type: application/json" \
    --data '{"purge_everything":true}' \
    "https://api.cloudflare.com/client/v4/zones/${CLOUDFLARE_ZONE_ID}/purge_cache" \
    | grep -q '"success": true'; then
    echo "Success."
    return 0
  else
  echo "Failure." >&2
    return 1
  fi
}

##################################################
# Main function of script.
# Globals:
#   DELAY_STEP_SECONDS
# Arguments:
#   None
##################################################
function main() {
  echo "Sleeping ${DELAY_STEP_SECONDS} seconds ..."
  sleep "${DELAY_STEP_SECONDS}"
  poll_build_status || exit 1

  echo "Sleeping ${DELAY_STEP_SECONDS} seconds ..."
  sleep "${DELAY_STEP_SECONDS}"
  purge_cache || exit 1
}

# Entrypoint
main "$@"
poll_build_status and purge_cache contain the functionality. The main function serves as the entry point executing those functions.
poll_build_status implements a while loop to repeatedly poll GitHub’s API. It succeeds if the response contains "status": "built" or times out after two minutes and fails.
Before each step, the script heuristically sleeps 15 seconds in case of latency issues with GitHub’s API or GitHub Pages updates.
Running the ./purge_cloudflare_cache.sh script locally should output:
Awaiting completion of latest GitHub Pages build ...
Success.
Purging Cloudflare cache ...
Success.
Note that for sites with lots of files, purging the whole cache should be avoided. Cloudflare supports purging the cache for individual files.
We could list only changed files if we wanted to with a command like git diff-tree -r --no-commit-id --name-only --diff-filter=DM gh-pages and only purge the cache for these files, but that’s out of scope for this post.
Now push .github/workflows/hugo.yml and purge_cloudflare_cache.sh to the repository:
git add -A
git commit -m "Add .github/workflows/hugo.yml, purge_cloudflare_cache.sh"
git push
Go check out the Actions tab on your GitHub repository. If everything is configured correctly, GitHub Actions should be building your site:

After the workflow succeeded, there won’t be any changes to the site because we didn’t change anything about our site, yet.
To make a change, switch to the light theme by setting defaultTheme = "light" inside the config.toml file. Push the changes by running git commit -am "Set default theme to light" && git push and another GitHub Action workflow should automatically be triggered.
After the build completes, your website should be displayed in the light theme. If it isn’t, make sure to also purge your browser cache.
Wrapping Up
It took quite a bit of effort, but you now have a hands-off system in place that helps you to publish content to your website in an automated way. All you have to do is pushing new changes to your GitHub repo and after a minute the changes will be live.