Use OBS and ffmpeg to Create Modern GIF-like Screencasts
In this post, I’ll share how I use OBS Studio and
ffmpeg to create short MP4/WebM video snippets for my
blog posts. Using the <video> tag with the autoplay and loop attributes
makes them look like GIFs. However,
modern video formats result in much smaller file sizes.
The above 30 second video has the following properties:
| Frames per second | 10 |
| Resolution | 1024x576 (16:9) |
| Size | 316 KB (MP4) 294 KB (WebM) |
| Bitrate | dynamic |
Most of my video content showcases CLI output or me interacting with an application. So I much prefer small file sizes over quality. The content area of my blog is less than 1000 pixels wide, so a video width of 1024 pixels is more than enough. 10 FPS looks choppy but is good enough for my purposes. Using dynamic bitrate reduces the file size even further.
OBS Settings
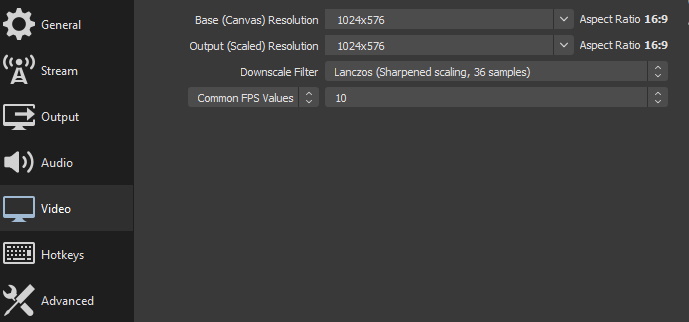
In OBS Studio, under Settings → Video, set the resolution and FPS.

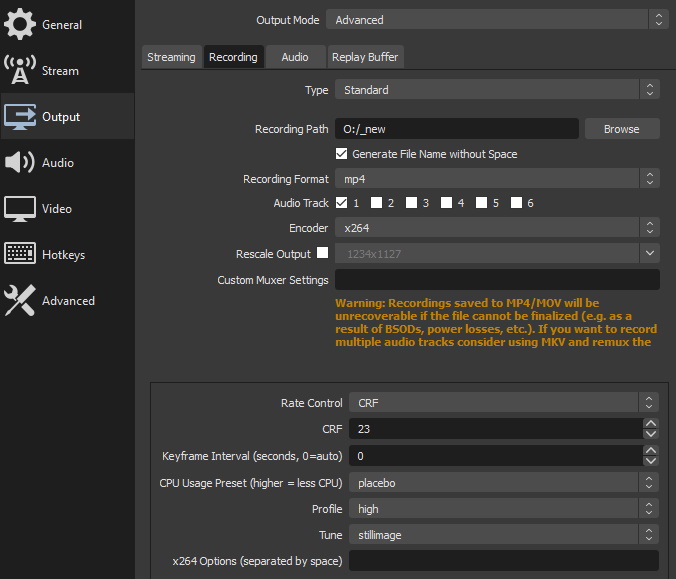
Under Settings → Output → Recording:
- Set the Recording Format to
mp4 - Set Encoder to
x264 - I chose
CRFRate Control on23for simplicity. Try lower values to increase quality. - The CPU Usage Preset
placebowill slow down encoding significantly and murder your CPU. But it will result in better compression. - I usually use Tune
stillimagebecause the picture in many of my videos doesn’t change a lot in-between frames

Remove Audio
Most of my videos don’t have any sound. To save a few kilobytes, I use ffmpeg’s
-an option to remove the audio stream from the container:
ffmpeg -i input.mp4 -c copy -an output.mp4
The -c copy codec option causes ffmpeg to copy all streams to the output file
instead of re-encoding them.
Transcode to WebM
To transcode input.mp4 to WebM, I use the following command:
ffmpeg -i input.mp4 -c:v libvpx-vp9 -crf 31 -b:v 0 -an output.webm
It re-encodes the video using the VP9 codec, with its default CRF value of 31.
The option -b:v 0 forces a dynamic bitrate. We remove the audio stream again
using the -an option.
Create Thumbnail
We select exactly one frame using the option -frames:v 1 option. The -ss
option allows us to set the time for capturing the thumbnail. The following
command captures the thumbnail from 25 seconds into the video:
ffmpeg -i input.mp4 -ss 00:00:25 -frames:v 1 output.jpg
Thanks for reading! Your mileage may vary, so I encourage you to read the ffmpeg docs and play around with the settings.
