Use the Trezor Hardware Wallet Anonymously Inside a VirtualBox Whonix VM With External Wallets Like Adalite and Monero GUI
In the past, I used an old laptop running Qubes OS for any cryptocurrency-related stuff, and it worked great. It’s where I first learned about Whonix, a desktop operating system designed to protect your privacy online. Unfortunately, Qubes OS is a bit picky about the hardware it runs on. My old laptop only has four gigs of RAM, and I could barely run two instances of MyEtherWallet in two separate qubes without the system running out of memory.
The Final Straw
When initially configuring my Qubes OS environment for Monero, I decided to go with the setup described in a user guide from the official Monero website:
With Qubes + Whonix you can have a Monero wallet that is without networking and running on a virtually isolated system from the Monero daemon which has all of its traffic forced over Tor.
Out of the blue, after more than a year of using this setup, I couldn’t start the daemon and the wallet GUI simultaneously anymore. I only had enough RAM to launch one, but not both, which made the setup unusable. So I had to buy new hardware.
Reducing The Complexity
I would have loved to get a NitroPad X230, a Qubes OS-certified laptop to tinker around with Qubes OS some more. Also, the guys at Nitrokey are doing a great job in the open-source space and deserve any support they get. But I ultimately decided to reduce the complexity of my crypto setup and went with a hardware wallet instead — the Trezor Model T.
I’ll guide you through my new “Whonix on VirtualBox” setup and the steps required to configure it.
Import the VirtualBox Whonix Appliance
First, we download the VirtualBox appliance provided by Whonix and make sure to verify the binary. This requires different steps depending on the OS you are using.
Next, we import the appliance into VirtualBox by clicking File → Import Appliance…, creating two VMs — the gateway and the workstation. The gateway connects us to the Tor network. The workstation will only connect through that gateway, so both VMs must run if we want to connect to the outside world from within the workstation VM.
Make sure to read the Post-installation Security Advice from the official Whonix docs. We change the default user password and install the latest updates for the gateway at the very least. After, we repeat the same for the workstation VM.
At this point, we can optionally clone the workstation VM to have a clean Whonix image if we ever want to start over from scratch.
Install the Trezor Dependencies
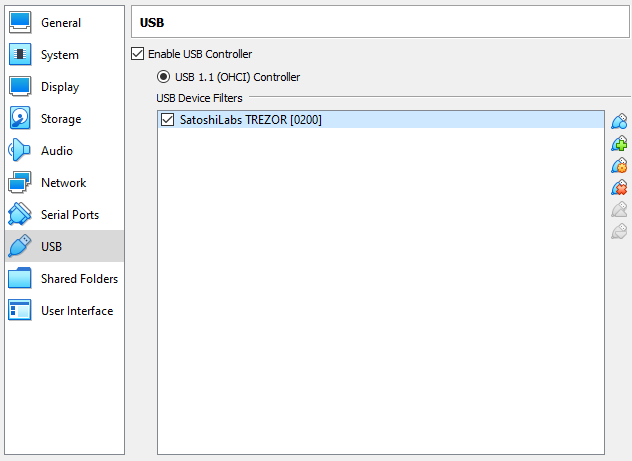
We can now connect the Trezor device to our computer. We then right-click on the workstation VM and select Settings…. Under USB, we check the Enable USB Controller and add the Trezor device. This way, it will be automatically attached to the workstation VM.

Let’s start the VM, open a terminal, and import the udev rule for Trezor to enable communication with the Trezor device via Linux kernel:
sudo curl https://data.trezor.io/udev/51-trezor.rules -o /etc/udev/rules.d/51-trezor.rules
Next, we download the SatoshiLabs 2021 Signing Key:
wget https://trezor.io/security/satoshilabs-2021-signing-key.asc
We verify the authenticity of the key by running:
gpg --with-fingerprint ./satoshilabs-2021-signing-key.asc
The value of the fingerprint is EB48 3B26 B078 A4AA 1B6F 425E E21B 6950 A2EC B65C. If it’s not, something is very wrong — do NOT continue! If everything looks good, we import the key:
gpg --import ./satoshilabs-2021-signing-key.asc
Then we download the Trezor Suite and corresponding signature by running the following in the terminal (replace XX.XX.X with the latest version):
wget https://suite.trezor.io/web/static/desktop/Trezor-Suite-XX.XX.X-linux-x86_64.AppImage
wget https://suite.trezor.io/web/static/desktop/Trezor-Suite-XX.XX.X-linux-x86_64.AppImage.asc
We verify the binaries by running:
gpg --verify ./Trezor-Suite-XX.XX.X-linux-x86_64.AppImage.asc
The output should contain:
Good signature from "SatoshiLabs 2021 Signing Key"
Next, we make the binary executable:
chmod +x ./Trezor-Suite-XX.XX.X-linux-x86_64.AppImage
To launch the Trezor suite and connect to our hardware wallet, we run:
./Trezor-Suite-XX.XX.X-linux-x86_64.AppImage
At this point, we can shut down the VM and take a snapshot so we can roll back later if we need to. I like to clone this VM again for each cryptocurrency requiring an external wallet. It increases the security and maintainability of the setup.
Using the Monero GUI
Besides giving the workstation VM a little more RAM, Monero doesn’t require additional setup since Whonix includes the Monero GUI. We launch the app and wait for the Monero daemon to sync, which might take a long time using Tor. After that, we’re ready to go!
Setting Up Adalite
Adalite is an open-source, in-browser wallet, and only a few steps are required to get it working.
First, we open the Tor browser and allow pop-up windows from https://adalite.io by adding an exception for it under Settings → Preferences → Privacy & Security.
Next, we launch the Trezor Suite by running ./Trezor-Suite-XX.XX.X-linux-x86_64.AppImage. It starts the included Trezor Bridge, which Adalite requires to communicate with the Trezor device. We can verify the Trezor Bridge is running by navigating to http://127.0.0.1:21325/status/ in the browser.
The final step is to change two advanced settings of the Tor browser by navigating to about:config and clicking Accept the Risk and Continue. We set the network.proxy.no_proxies_on to 127.0.0.1:21325, so traffic to the Trezor Bridge is not proxied through the Tor network. We also need to disable First-Party Isolation by setting privacy.firstparty.isolate to false.
We can now use Adalite by navigating to https://adalite.io. It might be a good idea to bookmark that address, so you don’t fall victim to a phishing attack in case of a typo.
Closing Thoughts
For my purposes, this setup provides more than enough anonymity. Depending on your needs, it might be overkill or might not be anonymous or secure enough. It always depends on your threat model.
I don’t like that SatoshLabs publishes a new signing key every year. Just one more thing to keep in mind come next year.
